Thursday, October 19, 2017

Getting Better at Paddling

CLC is right--it doesn't take long to learn paddle-boarding.  I paddled almost three hours today without incident.  Maybe I was a little more confident.  I also found that the board has wonderful secondary stability.  I.e., I thought I was about to go over once or twice when I first started, but the board stabilized after tipping just a couple inches.  So all in all it is a wonderful paddle-board and pretty good full-body exercise.

I was asked to provide a walk-around video of the board so people could get a better idea of the various sections, so here it is:

SUP Walkaround Video

Wednesday, October 18, 2017

Project Finished, Maiden Voyage


I decided to spray-paint a green stripe in the center of the deck to cover the area between the deck pads.

 The deck pads and carry handle are installed in this photo.  You can see the green stripe I added between the pads.  It's fairly close in color to some of the greens in the decorative fabric.

 I also installed an additional pad for Grommet.  I hope he will be able to come along for the ride once I become proficient on the paddle board.

 A simple cargo net is held on with suction cups.  We'll see how it works out.

I've also attached a tether to the aft end so I can easily recover the board when I fall in.  The loop goes around my ankle.

After finishing I took the board down to the lake for its maiden cruise (and my first time on an SUP).  I had a GoPro camera attached to my head, so I wasn't really sure where it would be pointing, but it came out OK.  You can watch the video and hear me talk about the experience on YouTube.  Somehow I didn't fall in, but I was pretty shaky.  Hoping to get some lessons soon.

Tuesday, October 17, 2017

Varnishing Finished--Getting Very Close to Completion

The hull bottom and sides are all varnished and the varnish had plenty of time to dry while I was in California.  Here the board has been flipped right-side-up and the deck got it's final sanding prior to varnishing.

Another shot of the sanded deck from the stern.

After the first coat of varnish: the stern . . .  
and bow.  Very happy with the varnish except for some bubbles.  More about that later.

Some shots after the final coat of varnish: the bow, . . . 
                                                      stern, . . .


and the entire board (difficult to get a shot that does justice to its full 14-feet).

As I said above, I love this varnish (Minwax Helsman urethane) except I'm getting bubbles no matter what.  I don't think the problem is with the varnish itself though--I think it has more to do with the method recommended in the book.  I.e., the varnish is applied with a foam roller and then the bubbles are "tipped out" with a foam brush.  I followed that method and though I tipped the bubbles out multiple times, I still found some when I came back later.  My guess is the foam roller is creating so many bubbles that they continue to emerge after it is too late to do another tip-out.

Still, the finish looks very nice and I want to get the board on the water.  I may sand it down again later and try applying it with a high-quality bristle brush, as recommended by Minwax.  The only problem with that is that the deck pads and breather tube will be in place and it will be difficult to do a good job around them.  I'll probably leave it as-is.  The finish looks great--you have to run your hand over it to feel the bubbles.


Sunday, October 1, 2017

Installation of Skegs and Final Epoxy Coat

Here are the twin skegs being glued in place.  The wood block is to keep them exactly 14 inches apart, vertical, and parallel while the glue sets.

The glue has set.  Next the skegs will be filleted and the eight strips of fiberglass fabric (two on each side of each skeg) shown will be used to help hold them in place.

This shows one of the finished fillets.  After the fillets gel (about 3 hours), the fabric strips will be adhered to them and more clear epoxy added.

Fiberglass strips epoxied in.  It's hard to see but they go up the sides of the skegs. There are double strips on each side.  I don't think anything is going to knock one of these skegs off.

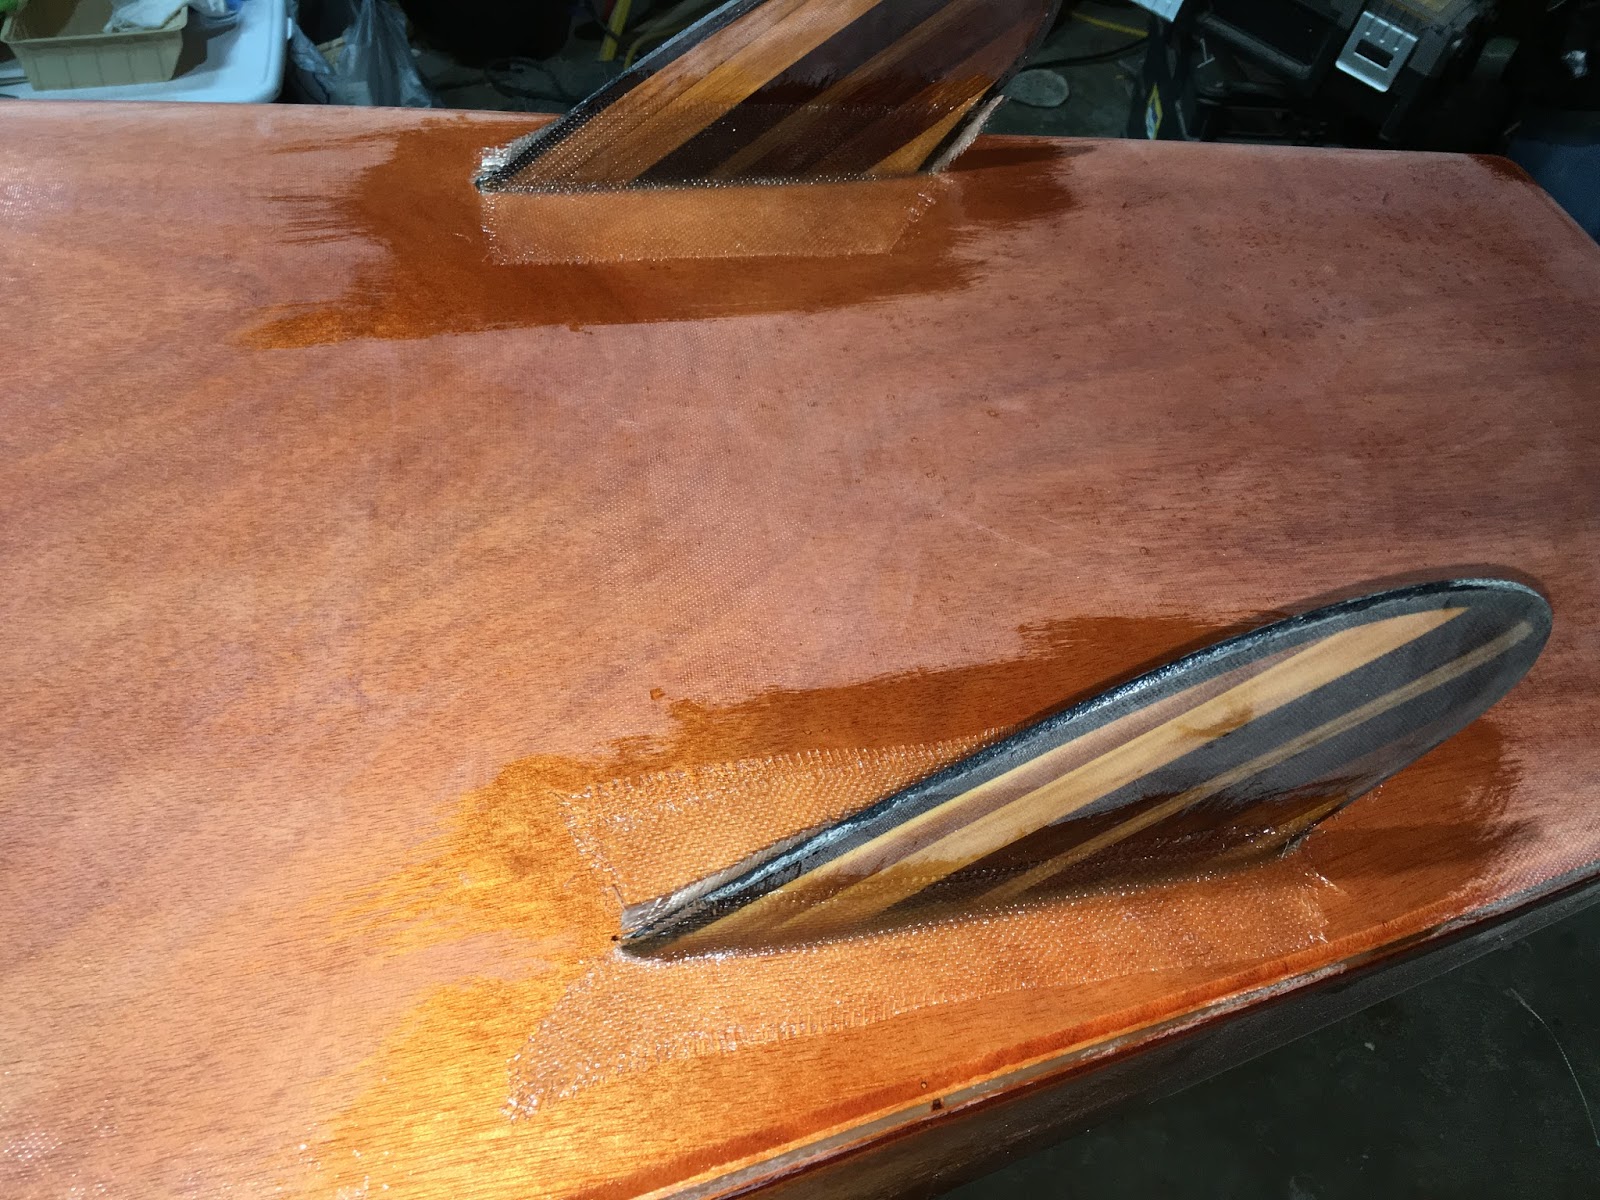
And the final coat of epoxy has been added to the hull bottom and the skegs.
Another shot from the bow end.

Tomorrow I start light sanding of the entire paddle board.  I hope to have that finished and begin varnishing on Tuesday.  As I said, the epoxy is supposed to be UV protected, but John Harris at CLC says he has seen UV protected epoxies come and go without success--he hopes this one will be the one that works, but it is too early to tell.  So I'm going to varnish it for more protection, and I also think I can get a little smoother finish that way.  I leave for California Wednesday, and stay for about a week.  My hope was to get this thing in the water before then, but it's not going to happen.

Weekend of Paddling and Sailing on Lake Elmer Thomas

I took my SUP and sailboat, Gaia, to Lawton/Ft. Sill for three days, October 28-30, to visit my wonderful friends, Andi and Andrew Kley. ...